Mastering Remote PC Control: A Deep Dive into .NET Core Service Implementation
1. Problem Description: Bridging the Remote Power Control Gap
In today’s interconnected world, the need for remote device management is more critical than ever. Imagine the frustration of needing to access your PC urgently while away from home, only to find it powered off. This common dilemma inspired me to explore solutions for enabling remote power control for my PC.
2. Techniques Used in the Solution:
a. Wake on LAN (WoL): Empowering Remote Wake-Up Calls
Wake-on-LAN (WoL) emerged as the foundation of my solution. This ingenious networking standard allows devices to be awakened remotely, even from a powered-off state. By sending a specially crafted “magic packet” over the network, WoL triggers the wake-up process, enabling remote access to the PC.
b. UDP Socket Server: Enabling Remote Shutdown Commands
To complement the wake-up functionality, I needed a mechanism to gracefully shut down the PC remotely. Enter the UDP socket server. Running on my Windows PC, this server listens for specific commands and initiates a system shutdown when triggered.
3. What I Have Prepared:
Raspberry Pi: The Backbone of the Service
To host the .NET Core service responsible for orchestrating remote PC control, I chose to leverage a Raspberry Pi. This compact yet powerful device serves as the central hub for executing commands and interfacing with the PC and Google Action.
Domain with SSL: Ensuring Secure Connectivity
To facilitate seamless integration with Google Action and ensure secure communication, I acquired a domain with SSL certification. This not only enhances the reliability of the connection but also instills confidence in the overall system security.
4. Explaining the Code to Achieve Each Technique:
WakeOnLan.cs: Unveiling the Magic Packet Sender
1
2
3
4
5
6
7
8
9
10
11
12
13
14
15
16
17
18
19
20
21
22
23
24
25
26
27
28
29
30
31
32
33
34
35
36
37
38
39
40
41
42
43
44
45
46
47
48
49
50
51
52
53
54
55
56
57
58
59
60
61
62
63
64
65
66
67
68
69
70
using System.Net;
using System.Net.Sockets;
using System.Text;

namespace SmartHomePCControl.Services;

public static class WakeOnLan
{
    public static void SendMagicPacket(string macAddress)
    {
        // Validate MAC address and remove any non-hexadecimal characters.
        macAddress = macAddress.Replace(":", string.Empty).Replace("-", string.Empty);
        if (macAddress.Length != 12)
            throw new ArgumentException("Invalid MAC address format");

        // Convert MAC address string to byte array
        var macBytes = Enumerable.Range(0, macAddress.Length / 2)
            .Select(x => Convert.ToByte(macAddress.Substring(x * 2, 2), 16))
            .ToArray();

        // Construct magic packet
        var magicPacket = new byte[6 + 16 * macBytes.Length];
        for (var i = 0; i < 6; i++) magicPacket[i] = 0xFF;

        for (var i = 1; i <= 16; i++) Array.Copy(macBytes, 0, magicPacket, i * macBytes.Length, macBytes.Length);

        // Send magic packet
        using var client = new UdpClient();
        client.Connect(IPAddress.Broadcast, 9);
        client.Send(magicPacket, magicPacket.Length);
    }

    public static void SendShutdownCommand(string ipAddress, int port)
    {
        try
        {
            // Create a UdpClient instance
            using var udpClient = new UdpClient();
            // Convert the shutdown command to bytes
            byte[] commandBytes = "shutdown-my-pc"u8.ToArray();
            // Send the command to the specified IP address and port
            udpClient.Send(commandBytes, commandBytes.Length, ipAddress, port);
        }
        catch (Exception ex)
        {
            // Handle any exceptions, such as network errors
            Console.WriteLine($"Error occurred while sending shutdown command: {ex.Message}");
        }
    }

    // Define a method to check if the PC is on/off based on socket port
    public static bool IsPCOn(string ipAddress, int port)
    {
        using var tcpClient = new TcpClient();
        try
        {
            // Attempt to connect to the PC's IP address and socket port
            tcpClient.SendTimeout = 500;
            tcpClient.ReceiveTimeout = 500;
            tcpClient.Connect(ipAddress, port);
            // If connection succeeds, port 3389 is open (PC is on)
            return true;
        }
        catch (SocketException)
        {
            // If connection fails, port 3389 is closed (PC is off or unreachable)
            return false;
        }
    }
}
The WakeOnLan class encapsulates the functionality for sending WoL magic packets. By converting the MAC address to a byte array and crafting the magic packet, this code initiates the wake-up process for the PC.
PcController: Orchestrating Remote Device Control
The PcController class serves as the backbone of the .NET Core service, handling incoming requests from Google Action and orchestrating remote control actions for the PC.
1
2
3
4
5
6
7
8
9
10
11
12
13
14
15
16
17
18
19
20
21
22
23
24
25
26
27
28
29
30
31
32
33
34
35
36
37
38
39
40
41
42
43
44
45
46
47
48
49
50
51
52
53
54
55
56
57
58
59
60
61
62
63
64
65
66
67
68
69
70
71
72
73
74
75
76
77
78
79
80
81
82
83
84
85
86
87
88
89
90
91
92
93
94
95
96
97
98
99
100
101
102
103
104
105
106
107
108
109
110
111
112
113
114
115
116
117
118
119
120
121
122
123
124
125
126
127
128
129
130
131
132
133
134
135
136
137
138
139
140
141
142
143
144
145
146
147
148
149
150
151
152
153
154
155
156
157
158
159
160
161
162
163
164
165
166
167
168
169
170
171
172
173
174
175
176
177
178
179
180
181
182
183
184
185
186
187
188
189
190
191
// PcController.cs

[ApiController]
[Route("/smart-home")]
public class PcController : ControllerBase
{
    // Define static variables for PC configuration
    private static string DEVICE_ID = "MyPC";
    private static string DEVICE_MAC = "ff:ff:ff:ff:ff:ff";
    private static string SERVER_IP = "192.168.1.2";
    private static int SERVER_PORT = 3389;
    private static int SERVER_SHUTDOWN_PORT = 10675;

    // Define the PC device metadata
    private static Device pcDevice = new()
    {
        id = DEVICE_ID,
        type = "action.devices.types.SWITCH",
        traits = new[]
        {
            DeviceTraits.OnOff,
        },
        name = new DeviceName
        {
            name = "My PC",
        },
        willReportState = true,
        deviceInfo = new DeviceInfo
        {
            Manufacturer = "Asus",
            Model = "DesktopComputer",
            HwVersion = "Core i5 13400F",
            SwVersion = "Windows 11",
        }
    };

    [HttpPost]
    public IActionResult HandleSmartHomeRequest([FromBody] JsonElement request)
    {
        // Deserialize the incoming request
        var jsonString = request.ToString();
        var requestDto = JsonConvert.DeserializeObject<RequestDto>(jsonString);

        // Check if the request is valid
        if (requestDto != null)
        {
            string intent = requestDto.inputs[0].intent;

            Console.WriteLine($"Intent = {intent}");

            // Route the request based on intent
            switch (intent)
            {
                case "action.devices.SYNC":
                    var syncRequestDto = JsonConvert.DeserializeObject<SyncRequestDto>(jsonString);
                    if (syncRequestDto != null)
                        return SyncDevices(syncRequestDto);
                    break;

                case "action.devices.QUERY":
                    var queryRequestDto = JsonConvert.DeserializeObject<QueryRequestDto>(jsonString);
                    if (queryRequestDto != null)
                        return QueryDevices(queryRequestDto);
                    break;

                case "action.devices.EXECUTE":
                    var executeRequestDto = JsonConvert.DeserializeObject<ExecuteRequestDto>(jsonString);
                    if (executeRequestDto != null)
                        return ExecuteCommand(executeRequestDto);
                    break;
            }
        }

        return BadRequest("Invalid intent");
    }

    // Handle SYNC request to provide device metadata
    private IActionResult SyncDevices(SyncRequestDto request)
    {
        // Create a sync response with PC device metadata
        var response = new SyncResponseDto
        {
            requestId = request.requestId,
            payload = new SyncResponsePayload()
            {
                agentUserId = request.agentUserId,
                devices = new[]
                {
                    pcDevice,
                }
            }
        };

        // Return the sync response
        return Ok(response);
    }

    // Handle QUERY request to provide device status
    private IActionResult QueryDevices(QueryRequestDto request)
    {
        // Check if the PC is on or off
        var devices = new Dictionary<string, DeviceAttributes>
        {
            {
                DEVICE_ID,
                new DeviceAttributes()
                {
                    status = QueryStatus.SUCCESS,
                    on = WakeOnLan.IsPCOn(SERVER_IP, SERVER_PORT),
                    online = true,
                }
            }
        };

        // Create a query response with PC status
        var response = new QueryResponseDto
        {
            requestId = request.requestId,
            payload = new QueryResponsePayload()
            {
                devices = devices,
            }
        };

        // Return the query response
        return Ok(response);
    }

    // Handle EXECUTE request to perform device control actions
    private IActionResult ExecuteCommand(ExecuteRequestDto request)
    {
        // Process the execute request and perform the corresponding action
        ExecuteResponseDto response = ProcessExecuteRequest(request);

        // Return the execute response
        return Ok(response);
    }

    // Process EXECUTE request and perform device control actions
    private ExecuteResponseDto ProcessExecuteRequest(ExecuteRequestDto request)
    {
        var states = new DeviceAttributes()
        {
            online = true,
            status = QueryStatus.SUCCESS,
            on = false,
        };

        var execution = request.inputs[0].payload.commands[0].execution[0];

        // Determine the action to be executed based on the command
        switch (execution.command)
        {
            case DeviceCommands.OnOff:
                states.on = execution.Params.on;
                if (states.on)
                {
                    // Turn on PC
                    WakeOnLan.SendMagicPacket(DEVICE_MAC);
                }
                else
                {
                    // Turn off PC
                    WakeOnLan.SendShutdownCommand(SERVER_IP, SERVER_SHUTDOWN_PORT);
                }

                break;
        }

        // Create an execute response with the updated device status
        return new ExecuteResponseDto
        {
            requestId = request.requestId,
            payload = new ExecuteResponsePayload
            {
                commands = new ExecuteResponseCommand[]
                {
                    new()
                    {
                        ids = new string[]
                        {
                            DEVICE_ID,
                        },
                        status = QueryStatus.SUCCESS,
                        states = states,
                    }
                }
            }
        };
    }
}
The PcController class encapsulates the logic for handling SYNC, QUERY, and EXECUTE requests from Google Action. It retrieves device metadata, provides device status, and executes device control actions accordingly, facilitating seamless interaction with the PC from anywhere.
UDP Socket Server Script: Enabling Remote PC Shutdown
The UDP socket server script written in C++ serves as a crucial component for enabling remote shutdown functionality for the PC. This script allows the .NET Core service to communicate with the PC over the network and initiate a shutdown process when requested.
1
2
3
4
5
6
7
8
9
10
11
12
13
14
15
16
17
18
19
20
21
22
23
24
25
26
27
28
29
30
31
32
33
34
35
36
37
38
39
40
41
42
43
44
45
46
47
48
49
50
51
52
53
54
55
56
57
58
59
60
61
62
63
64
65
66
67
68
69
70
71
72
73
74
75
76
77
78
79
80
81
82
83
84
85
86
87
88
89
90
91
92
93
94
95
96
97
98
99
100
101
102
103
104
105
106
107
108
109
110
111
112
113
114
115
116
117
118
119
120
121
122
123
// shutdown.cpp

#include <iostream>
#include <winsock2.h>
#include <ws2tcpip.h>
#include <windows.h>

// Link necessary libraries
#pragma comment(lib, "ws2_32.lib")
#pragma comment(lib, "user32.lib")
#pragma comment(lib, "advapi32.lib")

// Define constants
#define BUFFER_SIZE 1024
#define MESSAGE "shutdown-my-pc"
#define PORT 10675

// Function to initiate system shutdown
BOOL ShutDownMyPC()
{
    HANDLE hToken;
    TOKEN_PRIVILEGES tkp;

    // Get a token for this process.
    if (!OpenProcessToken(GetCurrentProcess(), TOKEN_ADJUST_PRIVILEGES | TOKEN_QUERY, &hToken))
        return (FALSE);

    // Get the LUID for the shutdown privilege.
    LookupPrivilegeValue(NULL, SE_SHUTDOWN_NAME, &tkp.Privileges[0].Luid);

    tkp.PrivilegeCount = 1; // one privilege to set
    tkp.Privileges[0].Attributes = SE_PRIVILEGE_ENABLED;

    // Get the shutdown privilege for this process.
    AdjustTokenPrivileges(hToken, FALSE, &tkp, 0, (PTOKEN_PRIVILEGES)NULL, 0);

    if (GetLastError() != 0)
        return FALSE;

    // Shut down the system and force all applications to close.
    if (!ExitWindowsEx(EWX_SHUTDOWN | EWX_FORCE, 0))
        return FALSE;

    // Shutdown was successful
    return TRUE;
}

// Main function
int main(int argc, char **argv)
{
    WSADATA wsaData;
    SOCKET listenSocket;
    sockaddr_in serverAddr;
    int addrLen = sizeof(serverAddr);
    char buffer[BUFFER_SIZE];

    // Initialize Winsock
    if (WSAStartup(MAKEWORD(2, 2), &wsaData) != 0)
    {
        std::cerr << "WSAStartup failed.\n";
        return 1;
    }

    // Create a socket
    if ((listenSocket = socket(AF_INET, SOCK_DGRAM, IPPROTO_UDP)) == INVALID_SOCKET)
    {
        std::cerr << "Failed to create socket.\n";
        WSACleanup();
        return 1;
    }

    // Set up the server address
    memset((char *)&serverAddr, 0, sizeof(serverAddr));
    serverAddr.sin_family = AF_INET;
    serverAddr.sin_addr.s_addr = htonl(INADDR_ANY);
    serverAddr.sin_port = htons(PORT);

    // Bind the socket
    if (bind(listenSocket, (struct sockaddr *)&serverAddr, sizeof(serverAddr)) == SOCKET_ERROR)
    {
        std::cerr << "Bind failed.\n";
        closesocket(listenSocket);
        WSACleanup();
        return 1;
    }

    std::cout << "Server is listening on port " << PORT << ".\n";

    // Receive data continuously
    while (true)
    {
        int bytesReceived = recvfrom(listenSocket, buffer, BUFFER_SIZE, 0, (struct sockaddr *)&serverAddr, &addrLen);
        if (bytesReceived == SOCKET_ERROR)
        {
            std::cerr << "recvfrom() failed with error: " << WSAGetLastError() << "\n";
            continue;
        }

        // Null-terminate the received data
        buffer[bytesReceived] = '\0';

        // Check if the received data is "shutdown-my-pc"
        if (strcmp(buffer, MESSAGE) == 0)
        {
            std::cout << "Received command to shut down the PC. Shutting down...\n";
            // Initiate system shutdown
            if (!ShutDownMyPC())
            {
                std::cerr << "Failed to initiate system shutdown.\n";
            }
        }
        else
        {
            std::cout << "Received: " << buffer << "\n";
        }
    }

    // Cleanup
    closesocket(listenSocket);
    WSACleanup();

    return 0;
}
Let’s delve into the key aspects of the script:
Winsock Initialization: The script starts by initializing Winsock using the
WSAStartupfunction, which is necessary for socket programming on Windows.Socket Creation and Binding: It creates a UDP socket (
SOCK_DGRAM) and binds it to a specific port (10675in this case) on the local machine.Listening for Incoming Data: The script enters a loop where it continuously listens for incoming data on the socket using the
recvfromfunction. When data is received, it checks if the message matches the predefined shutdown command ("shutdown-my-pc").System Shutdown: If the received message matches the shutdown command, the script initiates a system shutdown using the
ShutDownMyPCfunction. This function adjusts the token privileges to enable shutdown and then callsExitWindowsExwith the appropriate flags.Cleanup: Finally, after the server has finished its operation, it closes the socket and performs cleanup by calling
closesocketandWSACleanup.
This script effectively acts as a listener, waiting for a specific command to trigger a system shutdown on the PC. When integrated with the .NET Core service, it enables the remote shutdown functionality, allowing users to power off their PC remotely via Google Assistant.
Compiling the UDP Socket Server Script and Setting up Task Scheduler
To compile the UDP socket server script written in C++ and schedule it to run on Windows startup, follow these steps:
Compile the Script:
- Open a command prompt or terminal window.
- Navigate to the directory containing the
shutdown.cppfile. - Execute the following command to compile the script:
1
g++ shutdown.cpp -o shutdown.exe -lws2_32 -luser32 -ladvapi32
- This command compiles the
shutdown.cppfile into an executable namedshutdown.exe, linking necessary libraries (ws2_32.lib,user32.lib,advapi32.lib) for socket programming and system functions.
Setting up Task Scheduler:
- Once the
shutdown.exeis compiled, you need to configure Task Scheduler to run it on Windows startup:- Press
Win + Rto open the Run dialog. - Type
taskschd.mscand press Enter to open Task Scheduler. - In Task Scheduler, navigate to
Task Scheduler Libraryin the left panel. - Right-click on
Task Scheduler Libraryand selectCreate Task. - In the
Create Taskwindow:- Name the task, e.g., “PC Shutdown Server”.
- Go to the
Triggerstab and clickNew. - Choose
At startupunder Begin the task and clickOK. - Go to the
Actionstab and clickNew. - Under
Action, selectStart a program. - Click
Browseand select the compiledshutdown.exefile. - Click
OKto save the action. - Click
OKagain to create the task.
- Press
- Once the
Verify Task Scheduler Configuration:
- After creating the task, restart your computer to ensure that the script runs automatically on startup.
- You can also manually run the task from Task Scheduler to verify its functionality.
By compiling the UDP socket server script and setting up Task Scheduler to run it on Windows startup, you ensure that the server is always available to listen for incoming shutdown commands, enabling remote PC shutdown functionality seamlessly integrated with the .NET Core service.
5. Setup Google Action to Connect to My Server
Drawing Inspiration from Google’s Smart Home Node.js Sample
In my pursuit of enhancing home automation through voice-controlled commands, I found inspiration in Google’s Smart Home Node.js sample project. This comprehensive sample served as a blueprint for developing smart home actions compatible with the Google Assistant, empowering users to effortlessly manage IoT devices using voice commands.
Porting the Authentication Controller to C#
To seamlessly integrate Google’s authentication flow with my .NET Core service, I embarked on porting the authentication controller from Node.js to C#. Here’s a breakdown of the process:
Understanding the Node.js Implementation:
- Before commencing the porting process, I delved into the authentication controller within the Smart Home Node.js sample. This deep dive allowed me to grasp its intricacies and how it interfaced with Google’s authentication mechanisms.
Translating to C#:
- Leveraging my comprehension of the Node.js implementation, I began translating the authentication logic into C#. It involved replicating the functionality while ensuring compatibility with Google’s authentication requirements.
Maintaining Compatibility:
- Throughout the porting endeavor, I remained diligent in preserving compatibility with Google’s authentication protocols. This included handling OAuth2 authorization codes and seamlessly exchanging tokens to ensure a secure and streamlined authentication process.
Testing and Refinement:
- Post-implementation, rigorous testing ensued to validate the functionality of the C# authentication controller. By subjecting it to various scenarios and edge cases, I ensured its robustness and compatibility with Google’s Smart Home platform.
Explaining the Code Implementation
Let’s delve into the code snippet of the C# AuthController to elucidate its key components and functionalities:
1
2
3
4
5
6
7
8
9
10
11
12
13
14
15
16
17
18
19
20
21
22
23
24
25
26
27
28
29
30
31
32
33
34
35
36
37
38
39
40
41
42
43
44
45
46
47
// Implementation of AuthController in C#
using Microsoft.AspNetCore.Mvc;
using Microsoft.Extensions.Logging;
using System;
using System.Collections.Generic;
using System.Net;
using System.Threading.Tasks;

namespace SmartHomePCControl.Controllers
{
    [ApiController]
    [Route("/")]
    public class AuthController : ControllerBase
    {
        private readonly ILogger<AuthController> _logger;

        public AuthController(ILogger<AuthController> logger)
        {
            _logger = logger;
        }

        // Handles GET request for initiating the authentication process
        [HttpGet("login")]
        public IActionResult Login(string response_url)
        {
            // Renders a login page with a button to link the service to Google
            // User interaction starts the authentication process
            return Content($"<!DOCTYPE html>...</html>", "text/html");
        }

        // Handles POST request with authorization code to complete authentication
        [HttpPost("login")]
        public IActionResult PostLogin([FromForm] string response_url)
        {
            // Processes the authorization code and redirects to the response URL
            return Redirect(WebUtility.UrlDecode(response_url));
        }

        // Simulates OAuth2 token exchange endpoint
        [HttpPost("faketoken")]
        public IActionResult FakeToken([FromForm] Dictionary<string, string> body)
        {
            // Simulates token exchange and returns access and refresh tokens
            return Ok(new Dictionary<string, object> { ... });
        }
    }
}
GET “login” Endpoint:
- Responds to GET requests from Google’s authentication flow to initiate the authentication process. It renders a login page with a button to link the service to Google.
POST “login” Endpoint:
- Handles POST requests containing the authorization code generated during the authentication process. It processes the code and redirects to the response URL provided by Google.
POST “faketoken” Endpoint:
- Simulates the OAuth2 token exchange endpoint. It receives the authorization code and returns access and refresh tokens as per Google’s authentication requirements.
By meticulously porting the authentication controller from Node.js to C#, I laid a solid foundation for establishing a secure and authenticated connection between my .NET Core service and the Google Assistant, facilitating seamless interaction with smart home devices via voice commands.
6. Calling Google Assistant to Turn On or Off My PC:
With Google Assistant integrated, I can effortlessly issue voice commands to remotely power on or off my PC. By configuring intents and actions, I established a direct line of communication between Google Assistant and my PC.
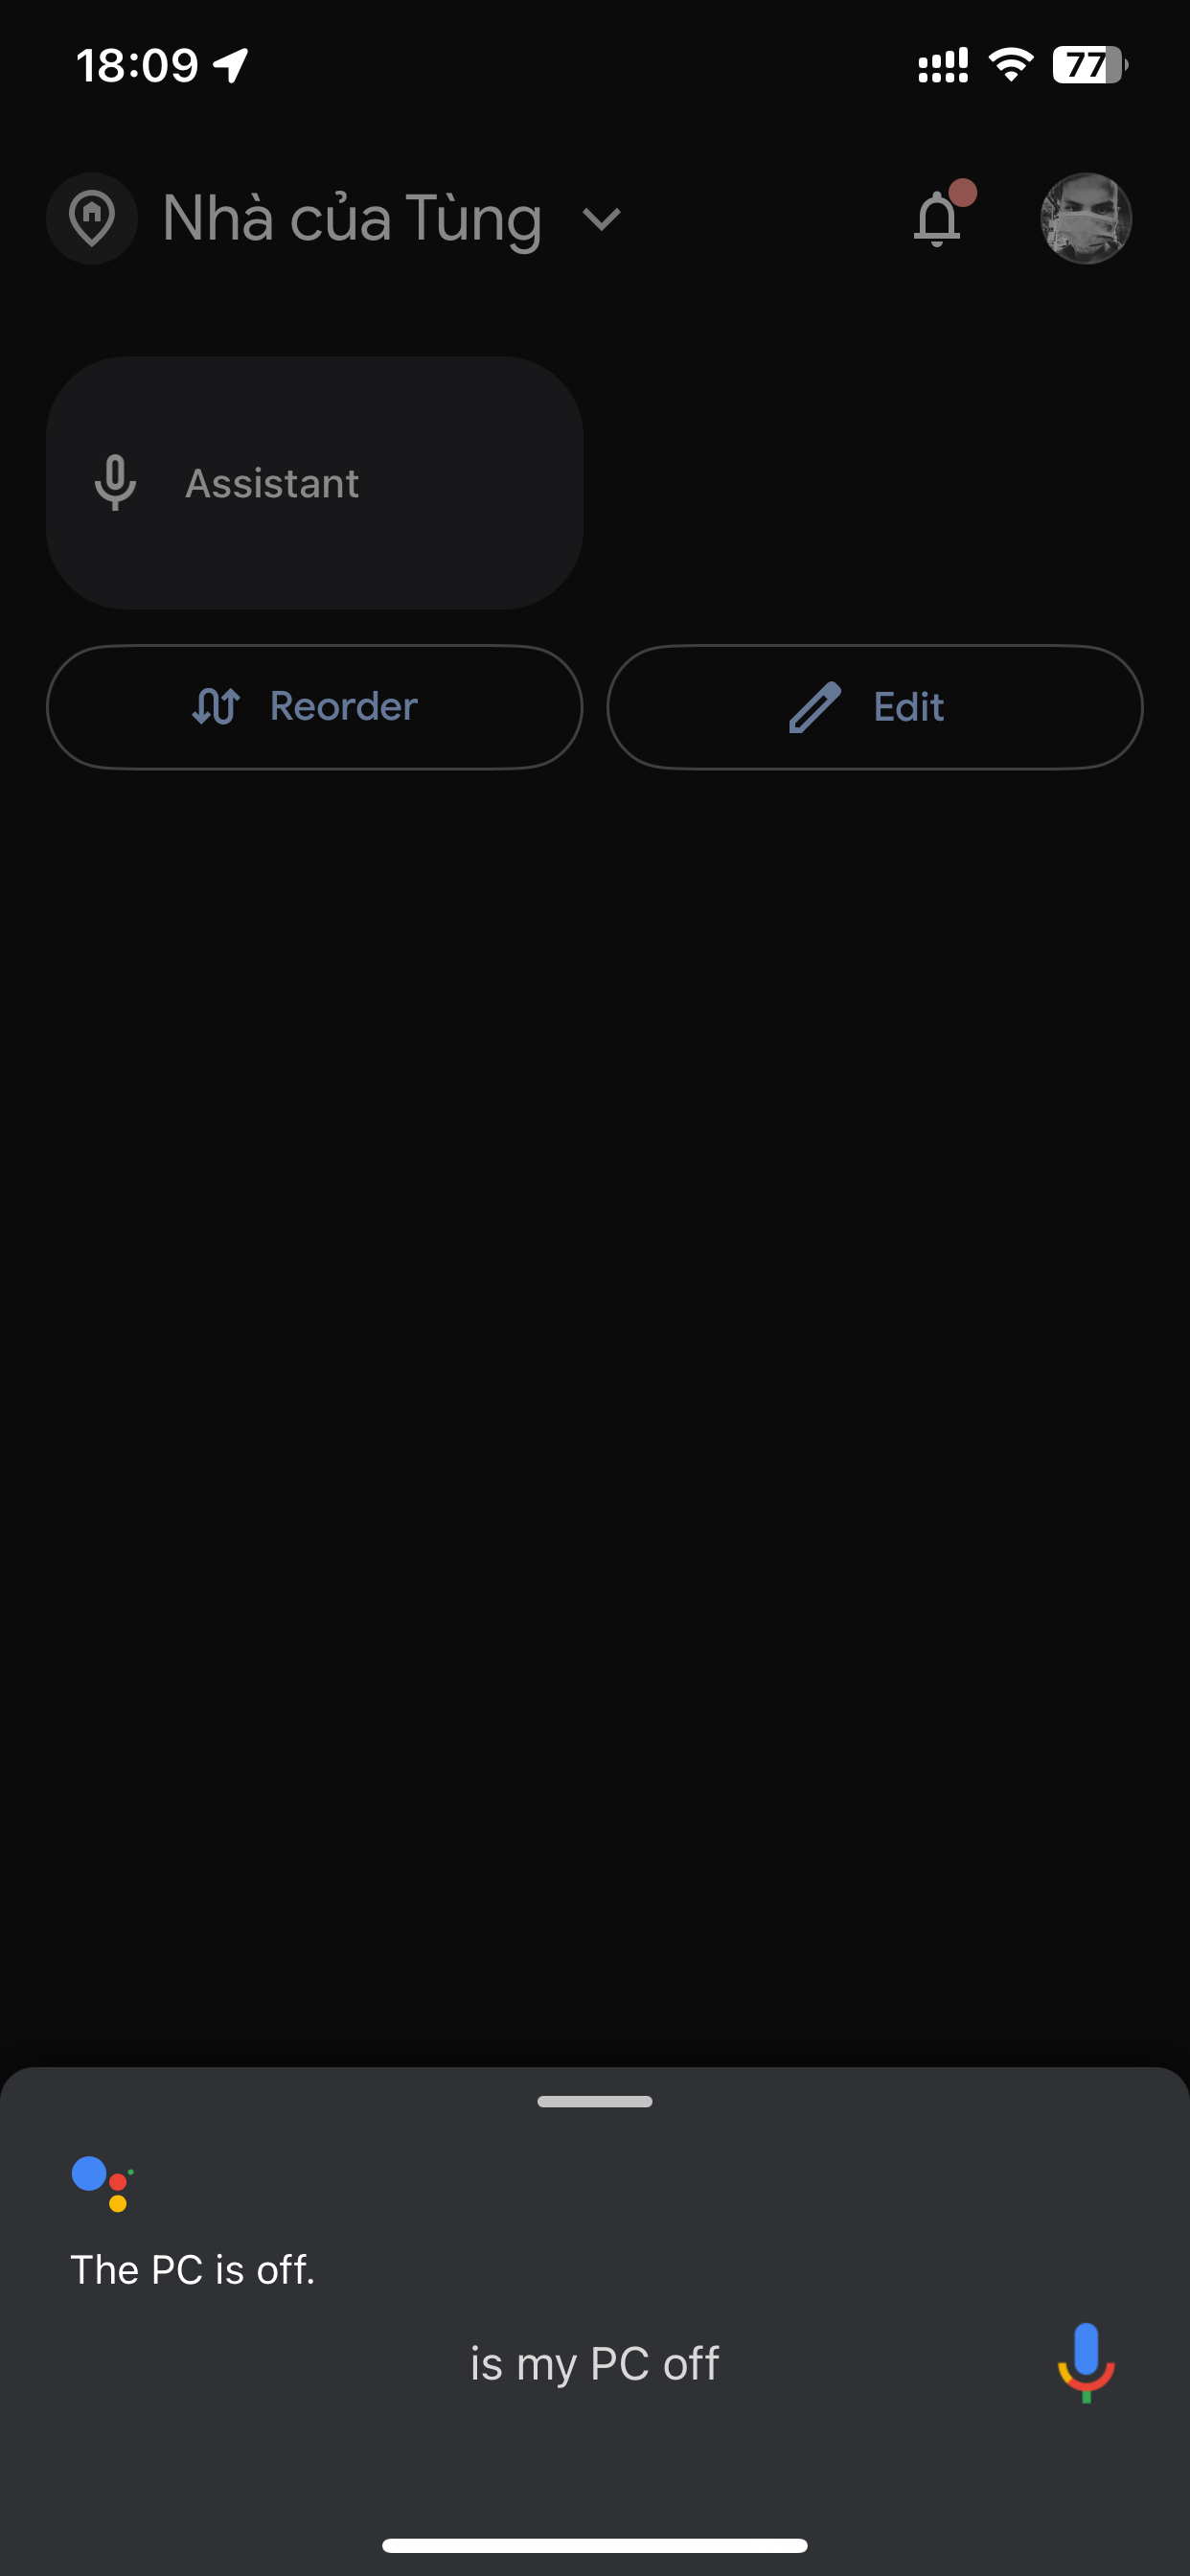
Checking for the PC state:
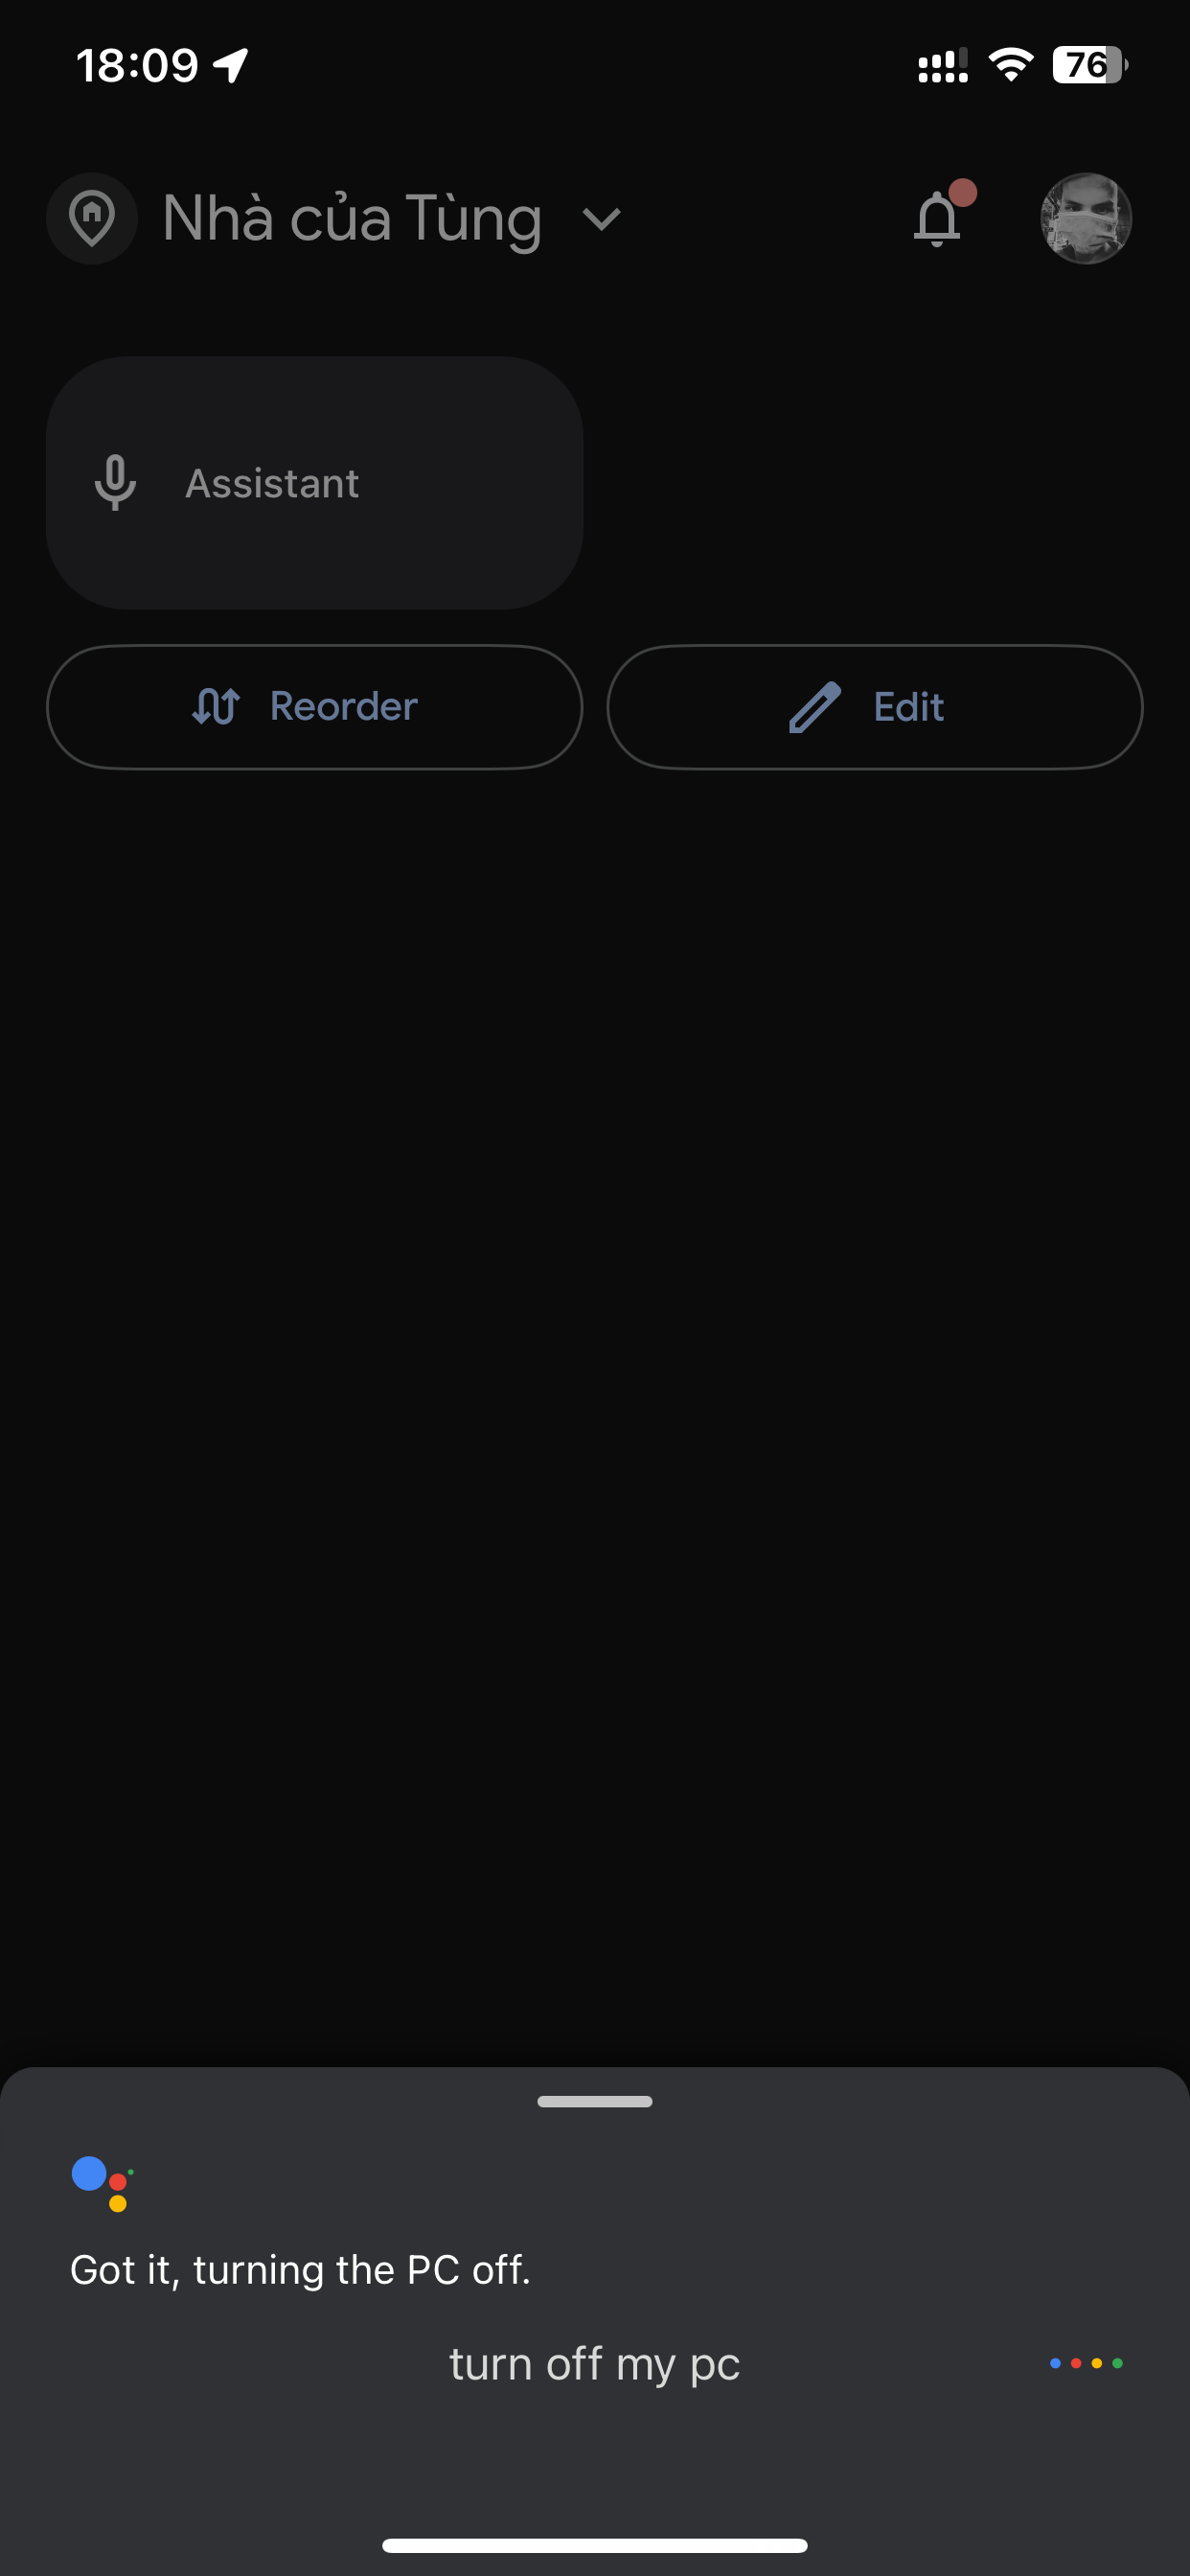
Call the Google assistant to turn on/off my PC
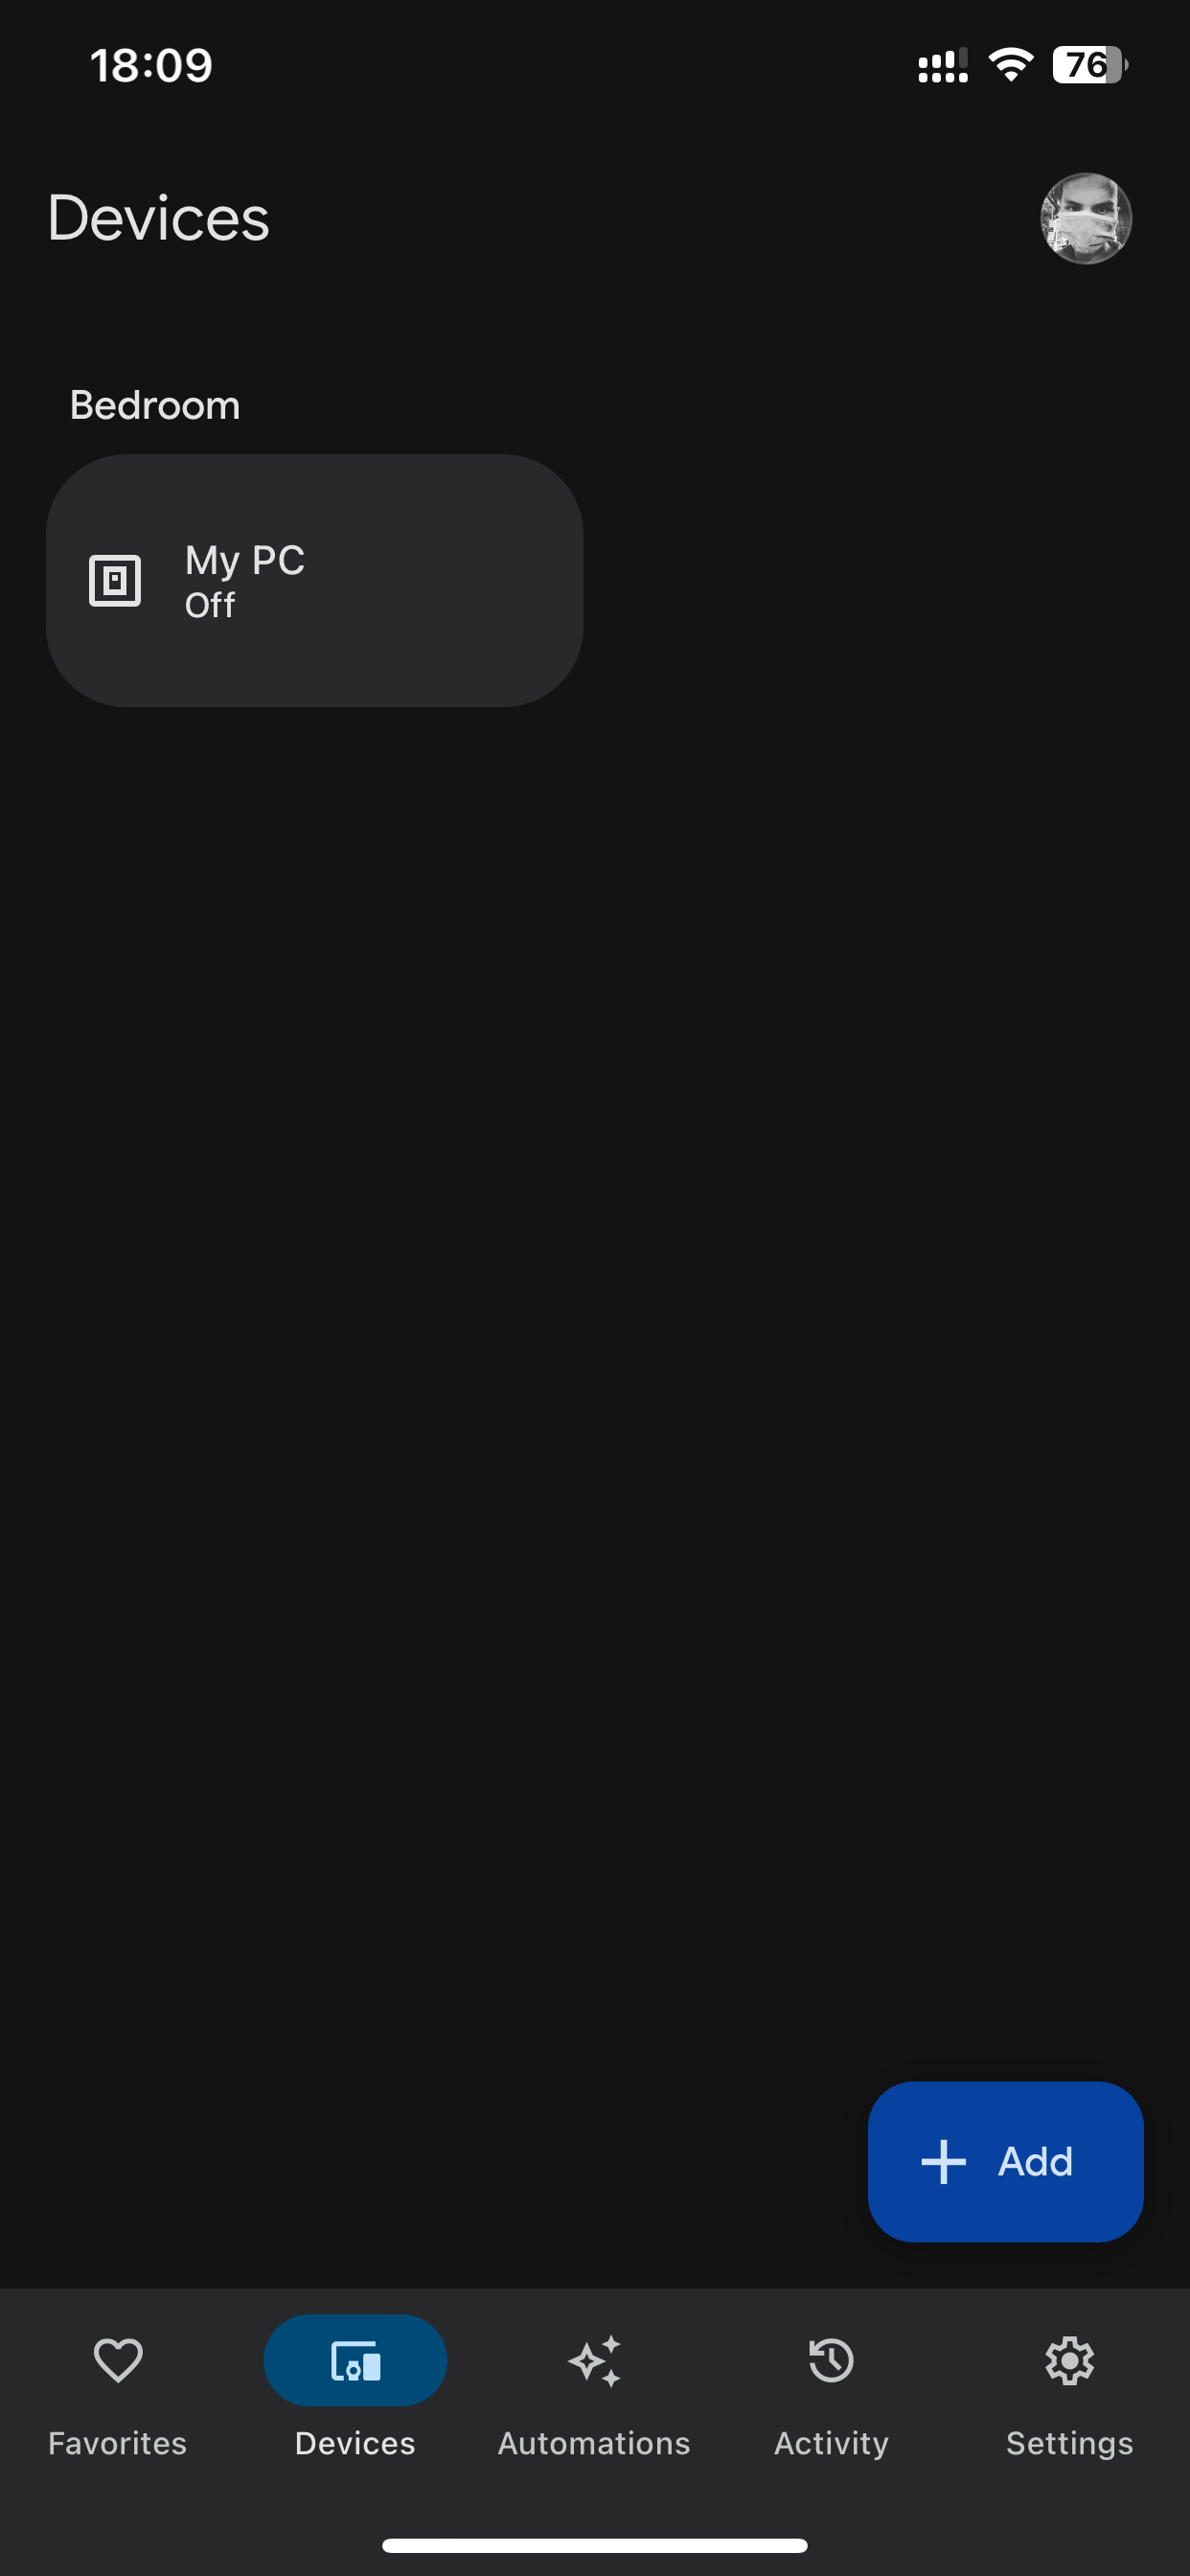
Using home control screen from Google Home app
7. Conclusion
In this journey to enhance home automation through voice-controlled commands, I have successfully implemented a .NET Core service capable of remotely managing the power state of my PC using Google Action and Raspberry Pi. By leveraging technologies such as Wake on LAN and UDP socket communication, I have empowered myself to control my PC effortlessly using voice commands via the Google Assistant.
Through meticulous code implementation and integration with Google’s Smart Home platform, I have established a seamless connection between the Google Assistant and my .NET Core service, enabling intuitive and efficient control over my PC’s power state from anywhere.
The choice of Raspberry Pi as the hosting platform for the .NET Core service reflects a commitment to energy efficiency and reliability, ensuring that the service remains operational round the clock without imposing significant energy costs.
As I continue to refine and expand the capabilities of my home automation setup, I invite fellow enthusiasts to explore the source code of this project on GitHub: SmartHomePCControl. Your contributions and feedback are invaluable as we collectively strive to build smarter and more connected homes for the future.